Joomla is a powerful and flexible content management system (CMS) that allows users to extend its functionality through the use of extensions. These extensions come in three main types: components, modules, and plugins. Installing theTraceMyIP extension in Joomla is a straightforward process. Below is a step-by-step guide to help you install this extension.
How to Install TraceMyIP Extension module for Joomla
You will need:
- Access to Joomla Administrator Panel: Ensure you have administrator access to your Joomla site.
- TraceMyIP Extension File: Download the extension file.
Step-by-Step Guide
Step 1: Log in to the Joomla Administrator Panel
- Open your web browser and go to your Joomla administrator login page. It is usually located at
http://yourdomain.com/administrator - Enter your username and password, then click the Log in button.
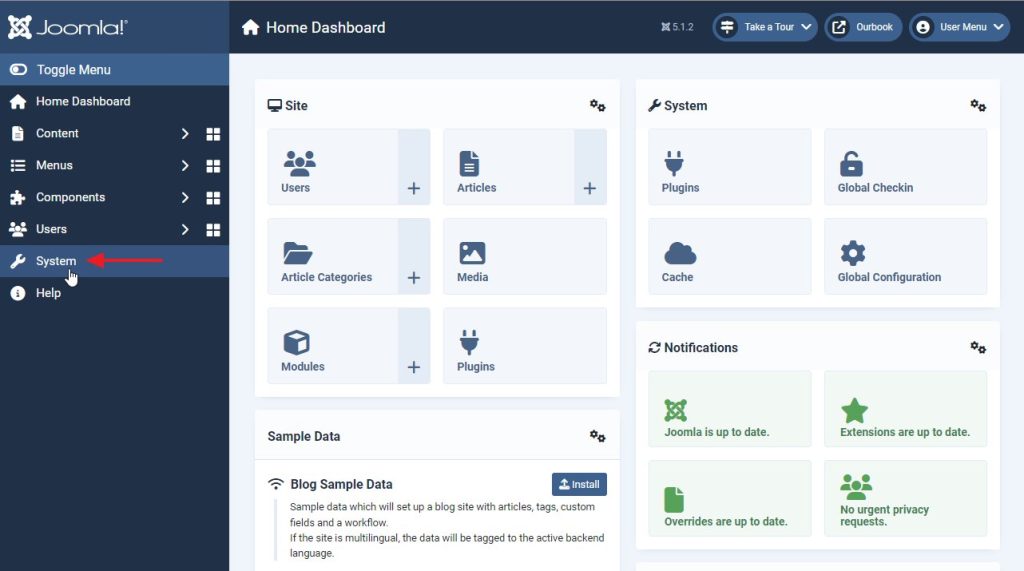
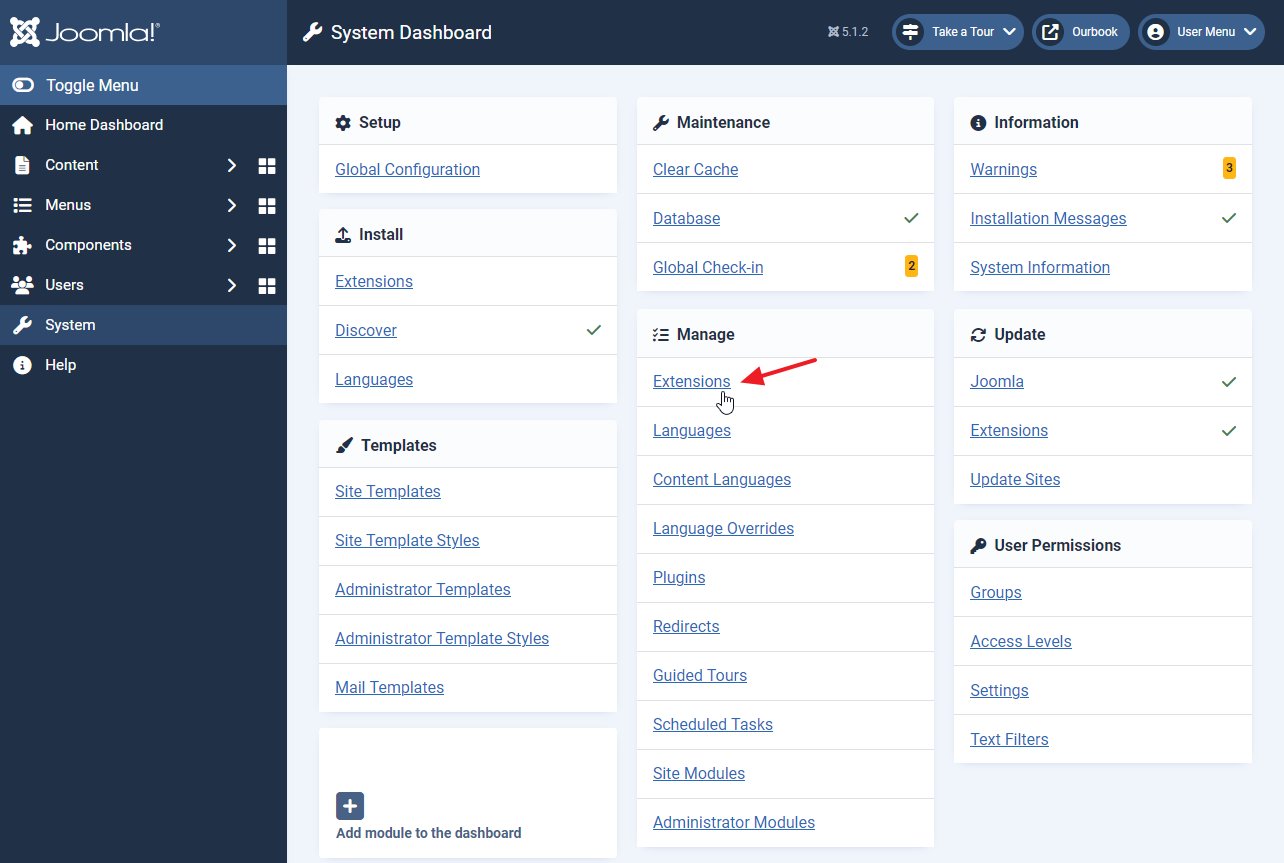
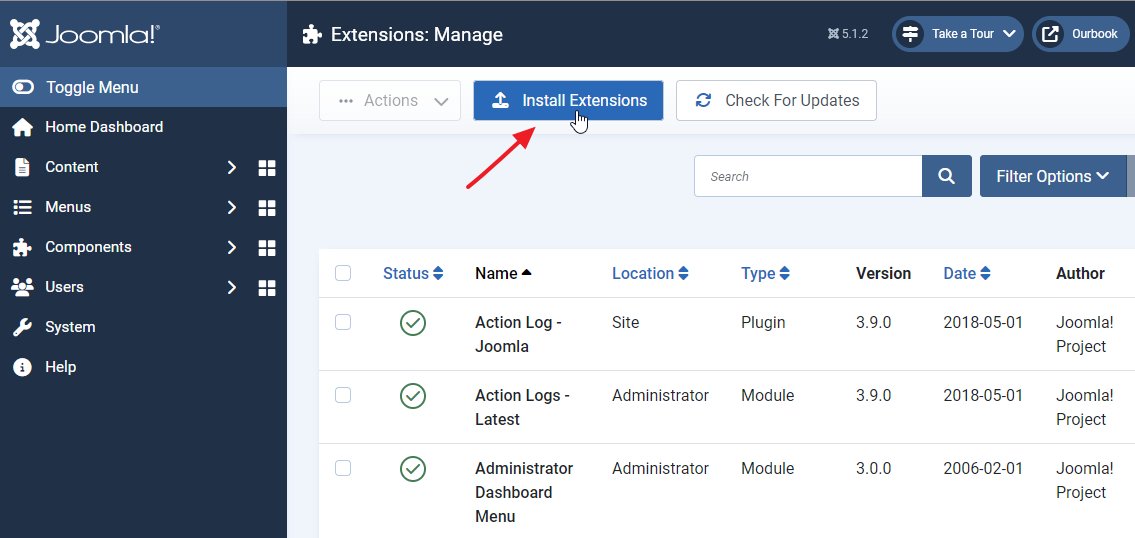
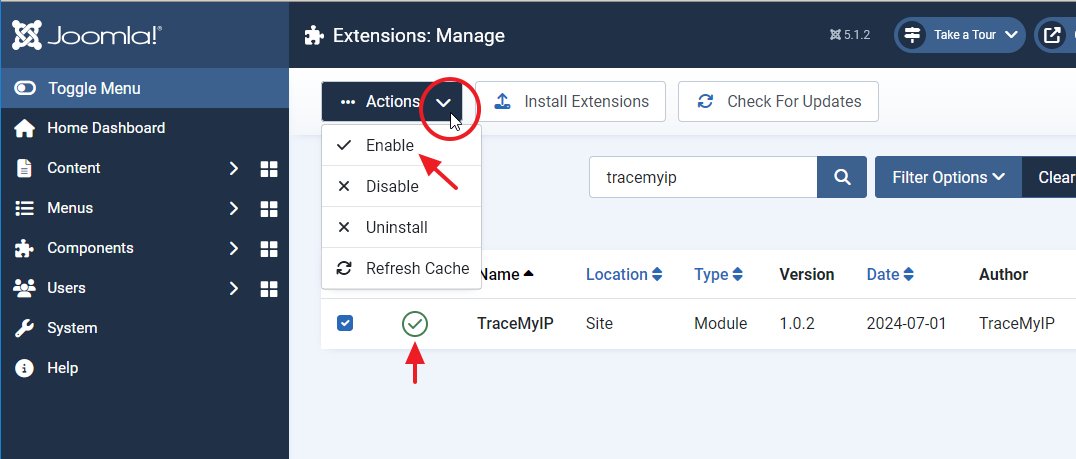
Step 2: Access the Extension Manager
- From the menu on the left, select System menu link
- Click on Extensions link under the Manage section
- At the top, click on the Install Extensions button
Step 3: Upload the TraceMyIP Extension File
The module can be installed either by uploading the file, installing from a folder on the server, or from a remote URL.
Here’s how the installation methods screen looks like:
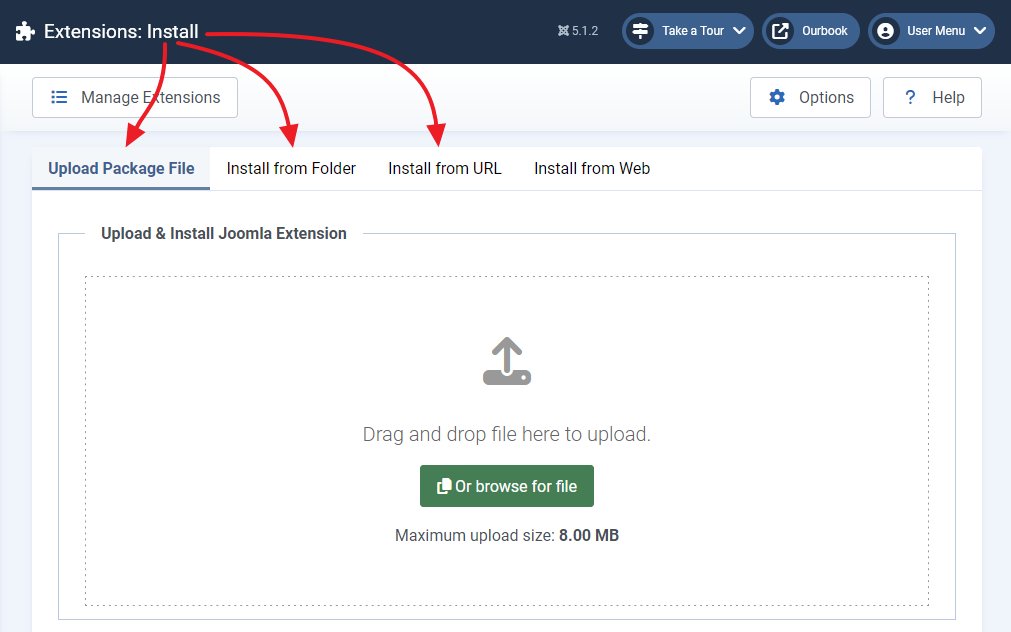
-
Upload Package File:
- Download TraceMyIP the extension for Joomla
- In the Upload Package File tab, click the Browse for File button.
- Select the .zip file of the extension you have downloaded.
- Click on Upload & Install. Joomla will automatically upload the file and install the extension.
-
OR Install from Folder:
- If you have extracted the extension files to a folder on your server, enter the path to the folder in the Install from Folder tab.
- Click Check & Install.
-
OR Install from URL:
- Enter the following URL in the Install from URL tab:
https://tracemyip.org/support/files/tracemyip-visitor-stats-tracker-joomla-module.zip - Click Install.
- Enter the following URL in the Install from URL tab:
-
OR Install from the WEB:
- Search for TraceMyIP extension
- Click on the extension and INSTALL button
Step 4: Confirm Installation
- After the installation process, Joomla will display a message indicating if the installation was successful.
- If the installation was successful, you will see a message like “Installation of the component was successful.”, thus confirming the TraceMyIP module installation
Step 5: Configure the Visitor IP Tracker Extension
- Using the menu on the left, navigate to Content > Site Modules to see a list of installed extensions. Here you can check in, enable, disable, or configure your newly installed TraceMyIP extension.
- If you have just installed the extension, you’ll see a padlock icon to the left of the TraceMyIP module name. Click on it to “check-in” the module
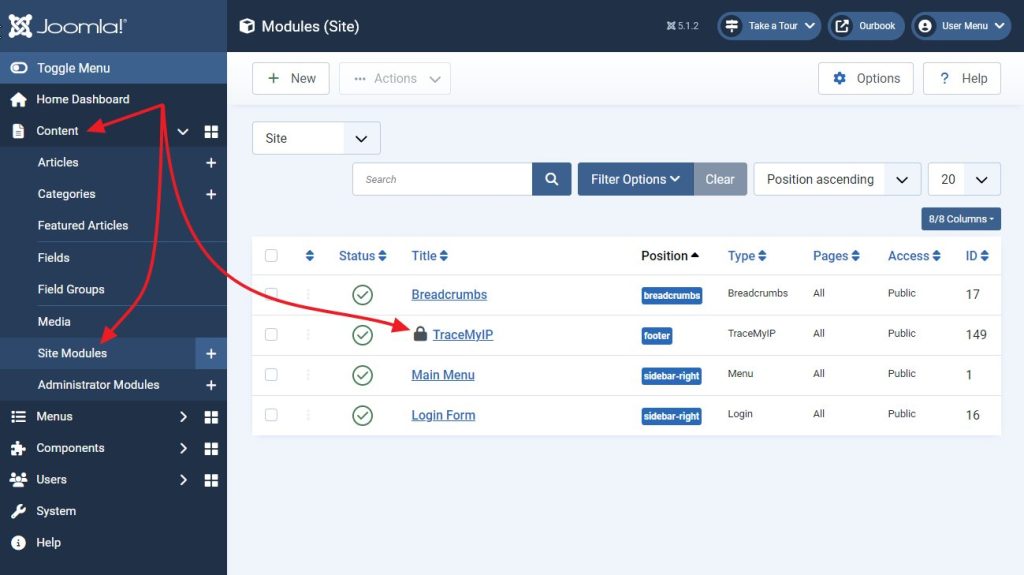
- Using the Actions menu at the top, you can also enable the extension if it’s not already enabled
- Click on the TraceMyIP extension name to get to the module configuration screen
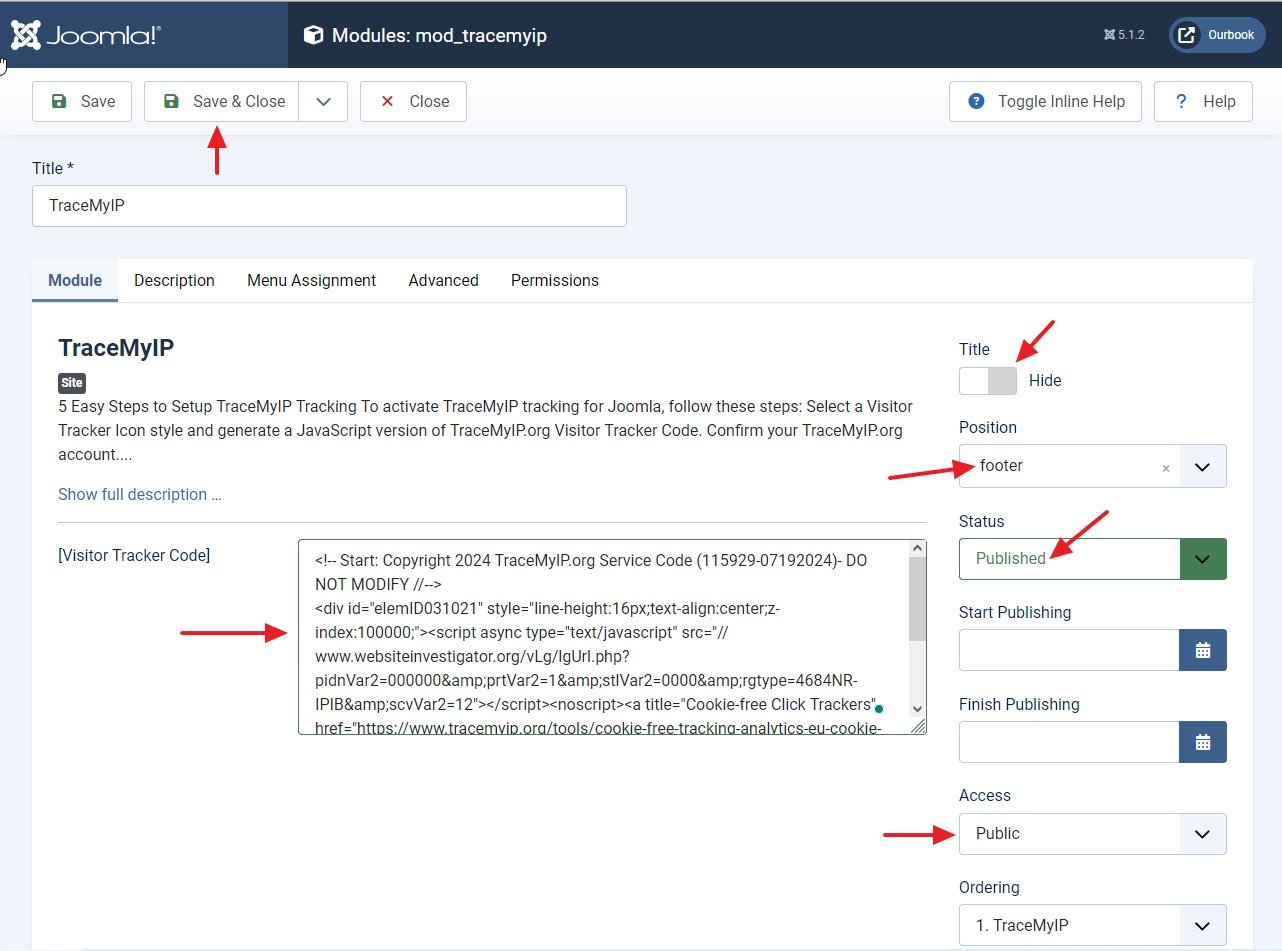
- Paste the visitor tracker code you have generated into the [Visitor Tracker Code] box
- Switch the Title option to “Hide” (unless you want the module title to be visible)
- The position option of the tracker code is important. If your pages don’t have a lot of content, you can place the code in the footer. However, if your pages have infinite scrolling or a lot of media and text, you should put the tracker code at the top of the page. This way, it will reliably capture visitor information. The reason is that some visitors using mobile devices might not fully load the pages. If the tracker code is at the bottom, it might not load, and you won’t capture all visits. If you need to make the tracker invisible, please refer to the invisible tracking option.
- Status. Set to Published
- Access. Set to Public
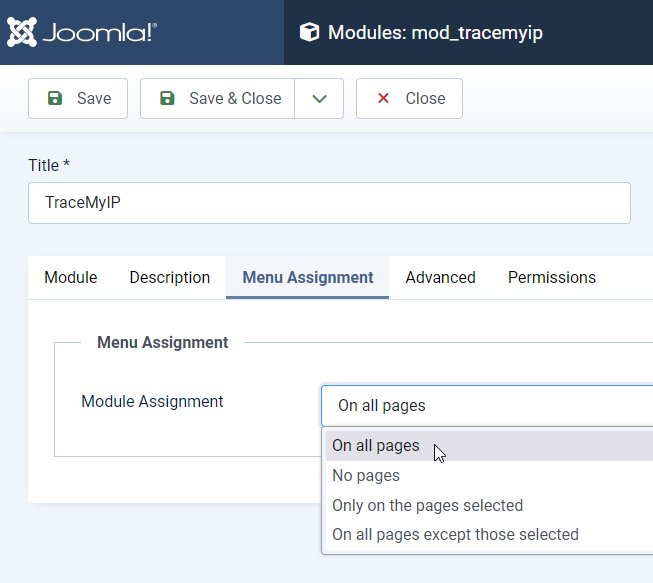
- Click on the Menu Assignment menu item above and set the Module Assignment option to “On all pages” and then on the Save & Close button at the top
Step 6: Test the Extension
- Visit the frontend of your Joomla site to ensure the extension is working correctly.
- Test at least a few pages of your desktop and mobile versions of the site to make sure that the tracker icon shows up on ALL pages of your site. If the mobile version of the site is not displaying the visitor tracker, you may need to make adjustments and module settings separately for the mobile version of your site.
- Once tested, you can enable an invisible tracker option if required.
Troubleshooting Tips
- Check Extension Compatibility: Ensure that the extension is compatible with your version of Joomla.
- Clear Cache: Sometimes, clearing the Joomla cache can resolve issues where changes do not seem to take effect.
- Go to System > Clear Cache, select all items and click Delete.
- Review Documentation: Refer to the installation documentation for specific installation and configuration instructions.
- Seek Support: If you encounter issues, submit a technical support ticket.
By following these steps, you should be able to successfully install and configure TraceMyIP for Joomla extension, enhancing the functionality and security of your website.
Enjoy!